10 ways to plan and prepare for Art and Craft Show* Success
- Ellen Smith

- Mar 15, 2019
- 11 min read
Updated: Mar 18, 2019
*I use the words show, fair, festival and pop up interchangeably as the prep for all of these events is so similar, if you have questions about adapting my tactics to meet your needs please feel free to ask*
10 ways to plan and prepare for Art and Craft Show* Success
Five years ago I participated in my first fine arts festival. The experience I had at 2014 Black Swamp Fine Arts Festival launched my business. Since that amazing weekend, I have participated in 26 festivals, fairs and pop-ups. I have a full season scheduled for this year in addition to regular submissions to galleries and active online sales.
Every event I attend is different. I have had huge successes as well as the occasional flop. I have won prizes, met incredible people, and grown my business tremendously. Festivals are not my only platform or source of income, but they make up a large portion of my sales and are a fantastic venue for networking. I've developed a routine, picked up tips from seasoned pros, overcome a lot of obstacles, and learned from my mistakes and triumphs.
Here are 10 things to consider when planning and preparing for Art and Craft shows and why they work.
Inventory. Inventory. Inventory.
You cannot sell what you don't have in stock. Make and take as much inventory as you possibly can. Have work in storage containers to rotate in when pieces sell or if something gets damaged. Bring a wide variety of items in different sizes and in a wide price range. It is easier to sell a $20 item than a $200 item, and also easier to sell something that doesn’t require a planned space or occasion. Still bring those big impressive item (see the next tip), but bring products for the likely customer not only the deep pocketed dream shopper.
Show Piece.
Bring your show pieces: the expensive, the eye-catchers, the wows. These pull people into your booth. Even if they may not be able to buy the $3,000 settee, they will step into your booth and might just buy the smaller item right beside it. The appreciative "wow" you hear as they walk by is a mental note for that customer. Even if they don’t come back, they will likely remember you, mention you, or even find you online or at another event.

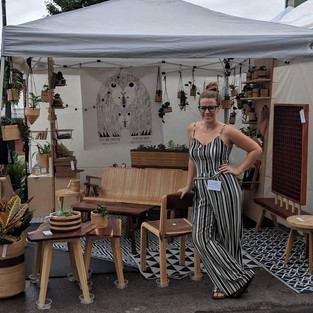


Display: Inventory
Keep it clean, organized, and simple. Don’t let the display rack be more interesting than the work on display. Is your work colorful and textured? Use clean white or otherwise plain backdrops and shelves. Don’t clutter the eye or the space. Allow room for people to move throughout your booth or move their eye across your table. This is where that stored inventory is important, you don’t want to have so many options that the buyer is paralyzed deciding which to choose.
Display your work in the way it is going to be utilized. If you are a jeweler or clothing designer have a few mannequins so the function of the work isn't left to the imagination. If you are a 2d artist, arrange the ‘pin-popular’ gallery wall. Throw in a few framed progress and personal photos so customers can imagine your piece hanging on their walls with other things around it. Show that your work can double as a stand alone piece or as part of a gallery wall. Do you make serving ware, or vases, other functional work? Stick some fruit in that bowl you made, flowers in your vase, or drink from your own mug. People like to know how your work will work for them, don't make them wonder. Show them.

Furniture makers, my key to success is arranging my booth like a room, with like item zones in the background. Toys are always displayed above a children’s table and stools with a few toys on the table to play with (this pulls kids in and entertains them while their parents shop). I love hanging planters together in a living wall, and cutting boards, spoons, and bare butter are always grouped. Similar items are likely to be purchased together.
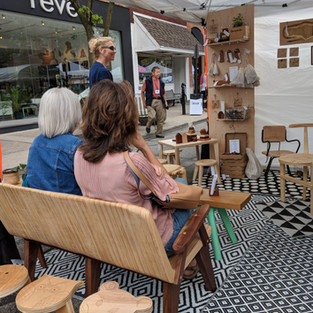
Allow people to touch. Art is a tactile experience for some. Obviously if it's going to damage your work don't allow it, but let people try on, lift, or sit on your work. Adding the sense of touch allows them to make another connection with the piece.


Display: Shelter, Surfaces and Storage
For an outdoor event a tent is a must, rain or shine! I use this tent and these walls from Amazon. I went with EZ-up because I am sometimes solo for set up or take down, also they are durable yet lightweight. It goes up fast, leaving plenty of time for arranging my booth. A lot of events require white tents. They also look cleaner and don’t retain heat like the darker ones. Walls aren’t a necessity, but they provide a nice backdrop for your work, privacy and weather protection. Weights, however, are a necessity, believe me. I’ve seen tents tumble down the road and it is terrifying. I use these weights. They are simply heavy fabric bags that you fill with sand, wrap around the legs and clip through the foot of the tent. I also use these ratchet straps to attach them to the top corners of the tent frame, I live in “Blowing” Green and I would rather be safe than sorry. Don’t forget the sand to fill them, better yet fill them before you get there, use them for your festival season and then empty them for off-season storage.
Now you have a roof, so it’s time for the floor. The concrete, asphalt, grass or whatever surface that the event is held on can be unlevel, wet, or otherwise damaging to your product. I use f. am tiles to provide padding for drops, to protect furniture legs, and to provide a layer between my work and moisture. It's also way more comfortable to stand on all day. I layer rugs on top of the tile to create a boho, homey look, setting the stage for my furniture and also creating zones; a playful rug under the kids table and toys, a big rug under the larger pieces and smaller rugs under smaller work and decor. The layered effect creates a traffic pattern to encourage movement through my booth. I got these rugs on Amazon, similar to this one and this one and the others are from Ikea.
Tables or counters are excellent for small item display. If all of your items are small, arrange your tables or counter in an inviting way. Tables also give you a spot to hide your extra inventory, purse and other belongings. I have this table from amazon and use this tablecloth. The table cloth has a velcro side making access under the table easy and the fitted sides neatly hide away clutter. Obviously if you are doing a smaller event allowing you only a table your limited display space needs to be carefully arranged. Go vertical if you can, have one or a couple of like products out at a time, display a variety of your work, but don't clutter the space, clutter creates discomfort for the buyer, and for you.
How do you go vertical? I made these peg boards for my booth (picture). I adapt them for specific shows and products, shelves rest on pegs. Boards and bags hang from pegs, and special notched pegs support my product baskets. I have two different types of stands for different needs, one pair is on casters, and the other are simple L brackets that hold the board upright against a wall. I also made these boxes to go over the support, sleek and professional and totally fits in with my natural wood vibe. You could also build or buy simple wooden shelves like these from Amazon. 2D and 3D artists use a grid system all the time, it's so versatile. It worked great for me at a recent show for hanging planters. Also utilize your cross pieces on your tent, hang things with fishing line, S Hooks or chain. But however you choose to go vertical remember to keep it organized and not too cluttered.


Let's talk storage during the event. Keep your spare inventory well organize and if possible, out of sight. I use clearly labeled black bins. I like the black ones because you can’t see whats inside; hiding clutter and the half eaten bagel my kid handed me. Also they can be used as a display surface in a pinch.
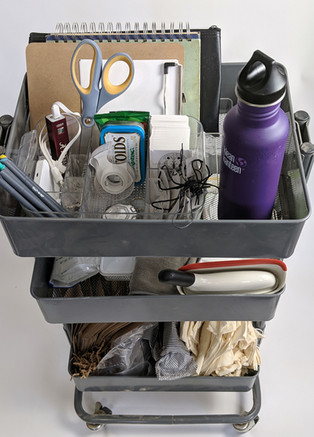
The bar cart is the command center of my booth. Its where I store my extra business cards, bags, my ‘quick tools’ (see below) and is my checkout station. I pack it before the event and simply roll it out the day of. This system is a game changer.
Speaking of Checkout . . .
How do you plan for customers to pay for your creations? Are your going to accept personal checks? If so have a sign in plain sight that says to whom to make checks payable. Have at least $100 in small bills for change. Are you going to round up for sales tax so you don't have to have coins or are you factoring sales tax into your price? The most common way to pay these days is with card or online transfer, so if you want to go this route, choose which platform. Venmo and Zelle are money transfer apps. Paypal and Square use card reader hardware. I use Square for credit sales at events and on my website, but also accept paypal online. I love my square chip reader, but got by just fine with the swipe reader for several years.
Figure out the best way to keep track of what you sell. Inventory sheet, check list, bar-codes (so fancy) or whatever system you come up with. My most successful system was a perforated tag system that I used for a few shows, I created essentially a ticket stub that I tore off of every item sold and stuck in my cash bag. At the end of the day I had lots of little tags as evidence of what I sold and for how much. It was efficient show day, but pretty tedious prep. Now I just print off my most recent inventory spreadsheet and try to keep up. Having a helper to log inventory is great, and even better if your helper can do all of the check out stuff leaving you to mingle with customers.
Keep track of your cost too! Deductions are important come tax season. Send someone for a lemonade during the event? Make note of that cost as well as booth fees, display costs, lodging and fuel.

Dress for Success
Bring a change of clothes, set up is exhausting and you want people to notice your work not your odor.
Wear something comfortable but professional. You will be standing for an extended amount of time, not a good day for heels or new shoes. You will likely be picking things up off the ground, so make sure you won’t bust a seam if you squat and that the only goods on display are the ones you made when you bend down. That being said, don't look too comfortable. Remember you are working (i.e. sweats are never appropriate for work unless you are a professional athlete). If your work is wearable, wear it. Have a friend in the show with wearable work, wear it. Buy wearable work from a stranger at the show, see if you can work it into your look and wear it. Artists support artists, and festivals are a great place to show that.

Get recognized.
Make an impression, be memorable to customers and walk-bys. This is where branding comes in. If you don't have a logo, make one. Then put that logo on everything.
Have business cards in easily accessible spots so passersby and people perusing your booth can grab them. Also, put a business card in every bag you fill with your product. Put that logo on each bag, give kids stickers or stamps (with parental permission). One of my favorite things to do is print a bunch of coloring pages for kids using my logo! I stick a hashtag at the bottom for their parents to share the result on social media and BAM free marketing! Also have a banner or sign with your name and logo, have two if you can. Print and frame an artist statement or bio. You might not have time to tell everyone your creative journey, and some people may not care. But if you have it available for people to read, they may choose this way to know you better. Printing a short bio for people to pick up and take with them is also a good idea. Let them know the person behind the product. Be relatable and authentic, your customers will connect with you and therefore remember you!

Signs and more logos
Your story is printed, your logo is up and your business cards are out. It's time for the convenience and entertainment signage. Do you deliver? If so make a sign so people don't have to ask. Have a sale going on? Make a sign. Invite people to sit, photograph or try on using a sign (and your voice). Sometimes people are too shy to ask, or don’t want to interrupt, so they move on without interacting. Having answers to common questions tastefully displayed allows you to communicate with potential customers even when you are deep in conversation with someone else.
This is true also with price tags, have your prices clearly displayed, whether in list form, signs, or on each item. Some people don't feel comfortable asking price, or you again are busy and having the prices listed is your easiest way of communication. Visual communication allows you to connect with truly interested people. Continue that communication easily by having an email signup sheet and display your social media handles. Staying in touch encourages the repeat customer.
I made these clipboard hangers that slide onto my pegs to display fun and entertaining signs such as: Quotes that inspire a product or your work ethic, product and process descriptions, a calendar of your next events, “where to find me next sign”, and photos of you in real life, living and working. Again, be relatable and reachable, especially for the people that move through your booth and don't get to talk to you.
Set up and take down plan
A set up plan should include your layout, the order in which you unpack things, the way you will hang, secure and place your work. What if its raining? What if the big show pieces sells, how will you fill the empty space? Plan for everything. Think about traffic flow. And remember, don't clutter and go vertical!
Shows over, now that take down plan is critical. You are tired, you may or may not be thrilled with your success, you may have crying children that don't want to wait patiently, not that I know anything about that. No matter what the circumstance, you have to get you and your work home. Know the order in which things need to be packed into storage and into the car to safely move your work without damage. Have rags ready to use in case you are loading up in the rain.
Call in reinforcements, friends or family that can hustle your work to the car. Also friends are nice to have around for congratulations or comfort. Plan for the kids if you have them in tow, have a friend designated to keep them clear of traffic and entertained. Or bring entertainment and bribes. You need to be focused on tear down so you can recuperate and move on to the next event.
Hope for the best. Plan for the worst
The best way to have a successful show is to plan and prepare for every possible obstacle and outcome. I know this sounds impossible and overwhelming but this tool box is the Mary Poppins Bag of Show Preparedness. It has been tested and improved during my six years of multiple art shows and saved me many a time. Adapt it for your art form, climate, and display and I am willing to bet you won't miss a beat if your neighbor knocks the lake of water off their tent during a torrential downpour further flooding your booth (again not that I would know anything about that).


Download the full Maker Show Checklist here.
Want a more in depth look at my tool box and why I pack like Mary Poppins? Read more here.
To shop my Mary Poppins' Bag of Show Preparedness List click here.
To shop all of my Art Festival Must Haves click here.
Do you have any tips and tricks that help you succeed at festivals? Comment below!
Little Bare Furniture is a participant in the Amazon Services LLC Associates Program, an affiliate advertising program designed to provide a means for sites to earn advertising fees by advertising and linking to amazon.com.

Comments